Diving into my first home lab setup, one piece at a time. It’s not finished, but it’s solving real problems, from photo backups to secure remote access.
I’ve been a tech nerd for as long as I can remember, but I’ve always stayed on the consumer side of things. The idea of a home server felt like something for a big-shot IT pro, not me. But recently, I decided to dive in and build my first beginner home lab. It’s not finished, it’s not perfect, but it’s mine, and I wanted to share the journey.
So why now? The main push was simple: I needed a better way to back up my stuff. My wife and I had years of photos scattered across our phones, and I wanted a central, private place to store them. Plus, I needed a reliable backup solution for our two laptops. Relying on a single cloud provider felt a little risky, and I loved the idea of having a local copy of everything that I control.
My Beginner Home Lab Hardware
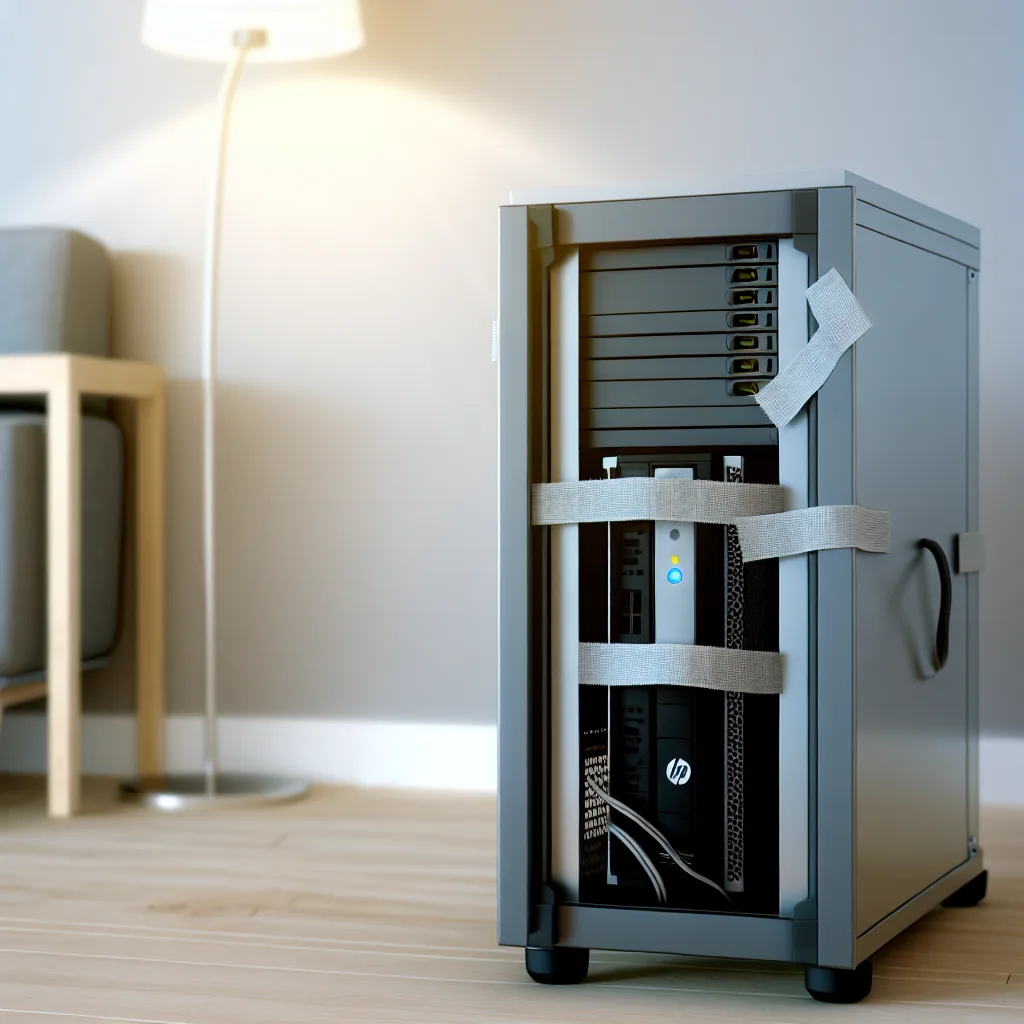
I started by picking up a simple 12U enclosed server rack. It’s nothing fancy, just a 17-inch deep box with a cooling fan, but it gives everything a home. To make it easy to move around, I just sat the whole thing on a small furniture mover dolly. Genius, right?
Here’s a look at the core components I’m starting with:
- The “Servers”: I’m using three HP EliteDesk 800 G2 small form factor (SFF) PCs. You can find these refurbished for a great price, and they have enough power for what I need right now. They’re small, quiet, and sip power. I’ve only got one racked so far, but the other two are waiting in the wings.
- The Storage: Inside the first HP EliteDesk, I have two 4TB IronWolf NAS hard drives set up in a mirror configuration (RAID 1). This means if one drive fails, the data is still safe on the other. A separate 256GB SSD runs the operating system to keep things speedy.
- The Network: To get faster-than-gigabit speeds between my devices, I added an 8-port 2.5GbE unmanaged switch. My laptops connect to it using simple USB-C to Ethernet adapters, giving me a zippy connection to the server.
- The Control: A simple USB 3.0 KVM switch lets me control both my laptop and the server using the same 32-inch curved monitor, keyboard, and mouse. It’s a small thing that makes managing everything so much easier.
The Software: What’s Running This Beginner Home Lab?
Hardware is only half the battle. The software is what really brings a home lab to life. I decided to go with TrueNAS SCALE as my server’s operating system. It’s incredibly powerful, based on Linux, and has great support for applications (their version of Docker containers).
Here are the key apps I’m running so far:
- Immich: This is my self-hosted Google Photos alternative. It automatically backs up and syncs photos from our phones to the server. It’s private, and I’m not paying a monthly fee to store my own memories.
- Veeam Agent: I use the Veeam agent on our laptops to handle full system backups to the NAS. It’s robust, reliable, and gives me peace of mind.
- Tailscale: This creates a secure network that lets me access my home lab from anywhere. It was surprisingly easy to set up and just works.
- Draw.io: I host my own instance of this diagramming tool, which is useful for mapping out my network and future plans.
Right now, my main backup strategy is local-first. Everything syncs to the NAS. From there, I have a script that backs up all the critical data to my Google One account. It’s a simple 3-2-1 backup strategy: 3 copies, 2 local (on the original device and the NAS), and 1 offsite (in the cloud).
The Journey Is Just Beginning
This setup is far from complete, and that’s the fun part. My next immediate step is to get the other two HP EliteDesk PCs online. I also have a 1U CyberPower UPS (uninterruptible power supply) to install, which will keep everything running safely during a power flicker.
For my offsite backup, I’m strongly considering Backblaze B2. Their pricing is very reasonable, and it would give me a true, separate offsite copy of my most important files, completely independent of my Google account.
Building this beginner home lab has been an awesome learning experience. It might look like a pile of parts to some, but to me, it’s a powerful tool that’s already solving real-world problems for my family. If you’ve been on the fence, I hope this shows you that you don’t need a perfect, finished rack to get started. Just jump in.