Category: AI

  • Troubleshooting Your Russound CA-4 Multi-Room Audio System

    Troubleshooting Your Russound CA-4 Multi-Room Audio System

    Simple steps to get those zones and keypads back up and running

    If you’ve just moved into a home with a Russound CA-4 multi-room audio system and suddenly find your speakers silent or your keypads unresponsive, you’re not alone. I recently helped a friend troubleshoot their Russound setup, and I want to share some straightforward tips for Russound CA-4 troubleshooting that might save you a headache or two.

    The Russound CA-4 is a tried-and-true multi-zone audio controller that lets you run music across different rooms or zones in your house. When it works, it’s pretty neat — each of the four zones can have its own volume and source.

    Understanding the Problem

    Imagine this: you buy a house with a Russound CA-4 already installed. Everything works fine. Then the controller suddenly dies. You find a replacement, so you plug it in, power it on, and see three of the four zones show up green on the controller’s display. But there’s no sound, no keypad lighting, and no way to change sources from the controller. Frustrating, right?

    What Could Be Going Wrong?

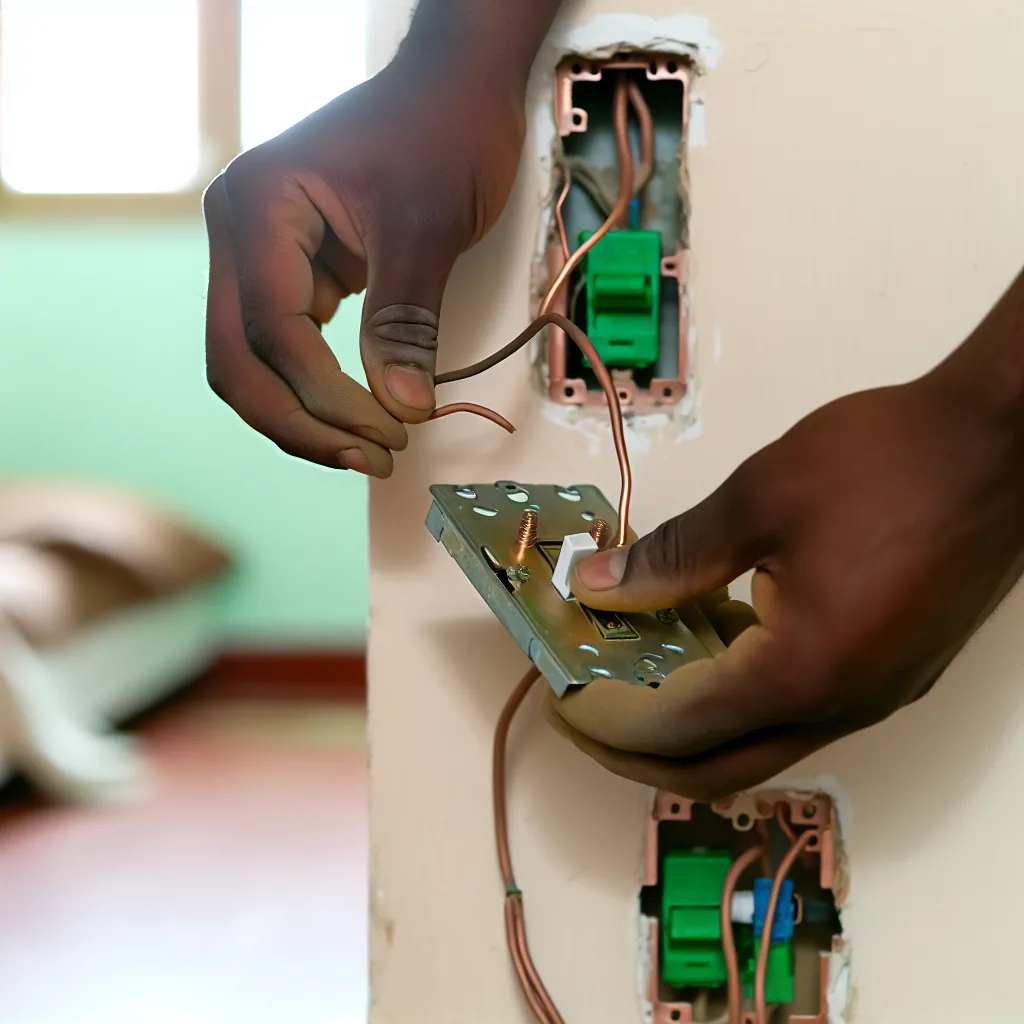
    1. Wiring Connections: When replacing the controller, it’s easy to overlook wiring connections. The keypads and speakers rely on low-voltage wiring that must be correctly connected to both the main controller and each keypad or speaker.

    2. Keypad Pairing Issues: The older Russound CA-4 controllers sometimes require a pairing process to link the keypads to the controller. If you swap out the controller, the new one may need to be paired again.

    3. Power Supply Problems: Even if the controller powers on, it’s worth checking if the power supply is stable and adequate. Keypads require power supplied through the controller or a dedicated power source.

    4. Firmware or Hardware Compatibility: If your replacement controller isn’t the exact match or if it’s a different version, there could be compatibility issues.

    Steps to Fix Your Russound CA-4 System

    • Check and Double-Check Wiring: Ensure all wiring to the controller matches the original setup. Use a wiring diagram specific to the CA-4 model, which you can find on the Russound support page.

    • Power Cycle Everything: Sometimes a simple power cycle — turning everything off and on again — can reset the system.

    • Re-Pair Keypads: Older Russound units sometimes require re-pairing keypads to a new controller. This usually involves pressing certain buttons on the keypad during power-up. The Russound CA-1 and CA-4 manual is a useful resource.

    • Test Each Zone Independently: Disconnect speakers and keypads in one zone and test with known working parts to isolate the problem.

    • Consult Russound Forums and Support: Other users have faced similar issues, and detailed troubleshooting advice can be found at places like AVS Forum and Russound’s own community.

    When to Call a Pro

    If you’ve tried all this and still can’t get those quiet zones singing again, it might be time to get a professional involved. Audio specialists or electricians familiar with multi-room audio systems have the tools and experience to dive deeper.

    Final Thoughts on Russound CA-4 Troubleshooting

    Multi-room audio systems like the Russound CA-4 are fantastic when they work but can leave you scratching your head when things go wrong. The good news: you can often tackle the problem without replacing everything.

    Stay patient, check your wiring, try re-pairing the keypads, and power cycle the controller. With a bit of persistence, you can get your home music back to life and enjoy those zones again.

    If you want to learn more about home audio troubleshooting in general, check out the CNET guide on home audio systems or the Official Russound website for technical details and product support.

  • Finding the Right 0-10V High Load Smart Dimmer for Your Home

    Finding the Right 0-10V High Load Smart Dimmer for Your Home

    Smart dimming solutions for heavy-duty LED lighting with 0-10V control and high current needs

    If you’re like me and have some pretty hefty LED lighting fixtures — say, industrial-style 200W bay lights — finding the perfect 0-10v smart dimmer that can handle the load can be surprisingly tricky. I’ve been on this hunt myself, trying to find a wall-mounted dimmer that doesn’t just control dimming via the 0-10v protocol but can also safely handle the high current these lights demand.

    So what exactly is a 0-10v smart dimmer? It’s a dimmer that uses a 0-10 volt control signal to adjust the brightness level of compatible lighting fixtures. This method is common in commercial and some higher-end residential LED systems. The key challenge comes when your lights have a higher wattage and draw significant current — not all smart dimmers can handle it safely.

    The Challenge of High Load 0-10V Smart Dimmers

    In my setup, I have five overhead bay lights, each running 200 watts and controlled via 0-10v dimming. This adds up to a big electrical load — typically requiring dimmers rated for 15 amps or more to be safe and reliable. Plus, there are some smaller LED fixtures mixed in on the same circuit, making the scenario even more complex.

    Most off-the-shelf smart dimmers fall short either on load capacity or integration flexibility. For example, some popular smart dimmers handle only 4 to 8 amps, which is simply too low. That’s why I needed to dig deeper.

    What I Learned About Available Options

    Here’s a quick rundown based on my research and experience:

    • Control4 C4-TV120277-SW: This is one of the few that can actually handle 15 amps and use 0-10v dimming. Downsides? It’s super expensive (sometimes $150-$200 per switch), hard to find, and uses Zigbee — but maybe a variant that’s not widely compatible with home automation hubs like Home Assistant.

    • Zooz Zen54: Great product but rated only for 4 amps, so it can’t handle the big bay lights alone. Also, it’s not a wall switch but a module that pairs with momentary switches, complicating installation.

    • Leviton D2710-1BW: Good quality but maxes out at 8 amps, falling short for higher loads.

    • Other Options: Some devices use Bluetooth, custom protocols, or have inadequate amperage ratings. ESPHome custom builds are interesting but might not fit cleanly in a wall switch box.

    Ensuring Your Smart Dimmer Works Like a Normal Switch

    One big point I’m picky about is reliability. The smart dimmer should always let you control the lights manually via the physical switch, no matter if your home automation controller is down. No hacks, intermediaries, or apps just to turn lights on or off. I want my smart dimmers to behave just like normal switches when needed — that’s non-negotiable.

    What About Protocols? Z-Wave, Zigbee, Wi-Fi, and More

    While I personally prefer Z-Wave because it integrates reliably with my smart home system, I’m open to Wi-Fi or Bluetooth if the product is well-designed. Zigbee would be okay, but only if well-supported.

    Matter is off the table for now since it’s just not supported in my setup, and I don’t want to add Zigbee hubs unless absolutely necessary.

    Bottom Line: What’s the Current Best Bet?

    The reality is, high-load in-wall 0-10v smart dimmers are a bit of a niche product with limited off-the-shelf choices that tick all boxes — load support, smart control, physical switch reliability, and protocol compatibility.

    For those with heavy-duty lighting setups, sometimes the best you can do is use a relay switch rated for the load and pair it with a separate 0-10v dimmer module. Or, experiment with DIY setups based on ESPHome, keeping in mind space and complexity.

    If you’re interested in exploring options further, check out these resources:
    Control4 Official Product Page
    Zooz Smart Home Devices
    Leviton 0-10V Dimmers

    Smart lighting is a bit of a puzzle when it comes to high load and 0-10v dimming, but with careful research and realistic expectations, you can find or build a setup that fits your needs and keeps the lights dimming smoothly. Until then, I’m still on the lookout too!

    If you have experience with high load 0-10v smart dimmers, feel free to share your tips — I’m all ears.

  • Finding a Home Assistant That Gets Your Indian Accent Right

    Finding a Home Assistant That Gets Your Indian Accent Right

    Choosing the best voice assistant for accurate medication reminders with an Indian accent

    If you’ve ever tried talking to a voice assistant and felt like it just doesn’t get what you’re saying—especially if you speak with an Indian accent—you’re not alone. Finding a home assistant that understands Indian accent perfectly can be tricky, but if your main goal is to get reliable medication reminders and set emergency calls hands-free, it becomes even more important.

    Let’s walk through what you might want in a home assistant and which options out there really listen well when your accent shifts between neutral English and Indian English.

    Why Finding a Home Assistant for Indian Accent Matters

    For many of us, voice assistants are a handy way to cut down on screen time. When managing medications, being able to simply say, “Remind me to take my allergy pill at 9 AM,” or “Tell me more about this medicine,” without fiddling on your phone is such a relief. But if the assistant struggles to understand your accent, those reminders might go wrong or the help you need might not come through—in an emergency, that’s a big deal.

    The Popular Players and How They Handle Indian Accents

    Apple HomePod Mini (Siri)

    If you haven’t dipped into the Apple ecosystem yet, the HomePod mini with Siri might catch your interest. Siri has been improving in recognizing different accents over the years. Apple puts a strong emphasis on privacy, too, which is reassuring when dealing with personal health info. However, Siri’s performance can sometimes vary depending on the dialect and phrasing. If you’re already using Apple devices, it can blend seamlessly with your setup.

    Learn more about HomePod mini

    Amazon Echo (Alexa)

    Alexa is widely known for a broad range of skills and compatibility with smart home devices. But how about understanding Indian accents? Alexa has made strides in recognizing Indian English better than before, especially since Amazon offers localized versions for India. It’s worth checking out if you want a lot of functionalities and decent accent recognition.

    Explore Amazon Echo devices

    Google Nest Hub (Gemini)

    Google’s Nest Hub powered by Gemini is neat because it integrates deeply with Google services and has a strong AI backbone. However, it sometimes struggles a bit when the accent flips back to Indian English during conversations. That said, it’s steadily improving with updates, so it might be worth testing it out yourself.

    Official Google Nest Hub

    Other Assistants? Maybe.

    Some smaller or newer AI assistants might have niche strengths, but they’re typically less tested and might not have robust emergency call features or medicine reminder capabilities. It’s worth searching forums or tech groups focused on Indian accents and home assistants for any emerging options.

    Privacy Considerations with Health Data

    When you’re dealing with medication reminders and health info, privacy is critical. Most major home assistants store some data in the cloud to work efficiently. Look for options that encrypt your data and give you clear controls over what is saved or deleted. Apple, for example, emphasizes local processing and privacy, while Google and Amazon offer settings to review and manage your voice history.

    Tips for Using Your Home Assistant for Medication and Emergencies

    • Test with your natural accent before relying on reminders.
    • Set up backup reminders on your phone or watch, just in case.
    • Look into voice profiles if the assistant supports them—it helps it recognize you better.
    • For emergencies, practice commands to ensure the assistant can place calls without confusion.

    Wrapping It Up

    Finding a home assistant that understands your Indian accent — including the shifts you naturally make — is crucial for managing your health hands-free and reliably. Apple HomePod mini, Amazon Echo, and Google Nest Hub are the popular choices, each with pros and cons on accent recognition and privacy. Testing each in your environment might be your best bet for peace of mind.

    Remember, the goal is to reduce screen time without sacrificing accuracy. And with the right home assistant, you can get just that.

    For more about privacy and smart speakers, take a look at Consumer Reports on smart speaker privacy.

    Happy smart living!

  • Setting Up Smart Controls for Your DC Ceiling Fan: What You Need to Know

    Setting Up Smart Controls for Your DC Ceiling Fan: What You Need to Know

    How to integrate your Home Depot DC ceiling fan with smart home triggers like Ring floodlight activity

    If you’ve recently installed a DC ceiling fan, like the Home Depot Home Decorators model with multiple light temperature settings and a six-speed DC motor, you might be wondering how to get it working automatically with your smart home gear. For example, could you have it turn on at a specific fan speed and light temperature when your Ring floodlight detects motion after dark? That’s exactly the kind of setup I’ve been curious about lately, and it turns out it’s doable — with some caveats.

    Understanding the Basics of a DC Ceiling Fan

    First off, what’s special about a DC ceiling fan? Unlike traditional AC fans, DC motors use less energy and offer more precise speed control. Many come with remotes that let you pick from multiple speeds and light color temperatures, like the one from Hampton Bay on Home Depot’s website here.

    The catch is that these fans are usually controlled by a remote rather than a simple wall switch. Your home wiring might just provide power from a single-pole switch that turns the fan on or off. The remote then handles all the speed and light temp adjustments. So, the fan’s “smart features” aren’t directly tied to your home’s power switch.

    Why This Makes Integration Tricky

    Because your fan’s settings are managed by an infrared or radio frequency remote rather than a smart switch, connecting it directly to an automation platform like IFTTT (If This Then That) can be a bit complicated. The usual smart switches that control AC motors might not be compatible with the DC motor tech.

    This wasn’t as much of a problem with simpler devices like smart plugs and string lights, where turning power on and off controls the on/off state. With the ceiling fan, simply cutting the power doesn’t preserve your preferred fan speed or light color temperature.

    What You’ll Need to Automate Your DC Ceiling Fan

    1. A Smart Infrared or RF Controller: Some third-party devices can emulate your fan’s remote control signals. By connecting these to your smart home system, you can send commands to change speeds or adjust light colors based on triggers, like motion from your Ring floodlight.

    2. Integration with IFTTT or a Hub: Once you have a compatible IR/RF controller, you can set up automation rules that respond to your Ring floodlight’s motion detection. This way, when motion is detected after 6 PM, your fan can adjust to your preferred settings automatically.

    3. Potential Workarounds: If your fan or remote supports smart home assistants like Amazon Alexa or Google Home natively, that could simplify control. Otherwise, custom setups with smart remotes might require some DIY tech skills.

    Alternatives and Tips

    If this sounds a bit too complex, an easier compromise could be using a smart plug just to cut power to the fan, turning it on or off with motion triggers. But remember, this won’t let you preset fan speeds or light temperatures — every time it powers up, it might default to some basic mode.

    For more detailed help, you could check out communities specializing in smart home integrations or look for tutorials on platforms like SmartHomeDB or the official documentation for your fan model and Ring floodlight.

    Wrapping Up

    The DC ceiling fan’s remote-controlled tech offers great features but doesn’t easily mesh with simple smart home routines based on power switching alone. To get the smooth automation of fan speed and light temp triggered by your Ring floodlight, investing in a compatible IR or RF smart controller is key.

    It’s a neat project if you enjoy tinkering with smart home setups and want more tailored control over your space’s comfort and lighting. Hopefully, this gives you a clearer picture of what’s involved and points you in the right direction!

  • Exploring the New Multi-Protocol Home Automation Hub

    Exploring the New Multi-Protocol Home Automation Hub

    A closer look at the compact hub with Wi-Fi, BLE, Zigbee, and Z-Wave running Home Assistant OS

    If you’re tinkering with home automation, you’ve probably noticed how clunky it can be to juggle multiple devices and protocols. That’s why the idea of a multi-protocol hub is so intriguing — a single device that plays nice with Wi-Fi, Bluetooth Low Energy (BLE), Zigbee, and Z-Wave, all while running Home Assistant OS right out of the box.

    This concept hub is designed to bring all those different smart home gadgets under one roof, making setup and management simpler. Imagine a compact Linux-based device that not only connects via multiple radios but also has the capacity to run your favorite open-source home automation platform, Home Assistant OS. For around $150, a basic version could be within reach, making it an appealing option for both hobbyists and newcomers.

    Why a Multi-Protocol Hub Matters

    Home automation is a bit like learning several languages at once. Your Zigbee smart bulbs, Z-Wave sensors, Wi-Fi speakers, and BLE trackers all speak different protocols. Without a hub that supports all of them, you end up with a messy network of dongles and bridges, each tied to a specific technology. A multi-protocol hub aims to fix that confusion.

    Having all protocols consolidated means fewer devices cluttering your space and a more streamlined control experience. Plus, running Home Assistant OS lets you customize and automate nearly every part of your smart home without relying on multiple apps.

    What Makes This Hub Stand Out?

    • Built-in radios: Supports BLE, Zigbee, Z-Wave, Wi-Fi, and Ethernet.
    • Compact Linux-based system: Runs Home Assistant OS smoothly.
    • Affordable: Basic model aiming for around $150.

    There’s talk of a “pro” version too, with enhanced microphones, speakers, and even offline voice recognition powered by a small language model (LLM). Imagine commanding your home without needing to connect to cloud services.

    Which Protocols Matter Most?

    If you’re considering such a hub, the question is—what radios do you really need? BLE, Zigbee, and Z-Wave are common standards in smart home devices. Including all three covers a large portion of the market. Wi-Fi and Ethernet remain essential for internet connectivity and network stability.

    The Pro Model: What Could Justify the Premium?

    Voice interaction has become a key convenience feature. High-quality hotword detection, a mic array for better sound capture, and offline speech-to-text (STT) and text-to-speech (TTS) could make the pro version worthwhile. Especially for those who value privacy or want to reduce reliance on external servers.

    What Would Make You Switch?

    To replace your current setup of dongles and bridges, a multi-protocol hub needs to offer more than convenience. It should ensure reliability, easy integration, and possibly features current devices lack like local voice control. Your feedback about what features matter most helps shape the final product.

    Final Thoughts

    If there’s enough interest, this project may open to crowdfunding, which means enthusiasts could have a say in its features and even pre-order their units. It’s an exciting prospect for anyone wanting a cleaner, smarter, and more integrated home automation experience.

    For more on home automation and protocol details, check out Zigbee Alliance and Z-Wave Alliance. To dive deeper into Home Assistant OS, visit their official website.

    In the end, this multi-protocol hub concept might be exactly what’s needed to reduce the chaos of smart home setups. Keep an eye out for more updates and consider what features would make you take the plunge into a unified smart home system.

  • Smart Radiator Fans: Can Your Cellar Heater Get Smarter?

    Smart Radiator Fans: Can Your Cellar Heater Get Smarter?

    Discover how to track your radiator fan’s usage with a smartphone app for better heat control at home.

    If you’ve ever found yourself wishing your radiator could work a bit smarter, you’re not alone. Especially in places like a cellar where heat tends to stick close to the metal and doesn’t quite make it into the wider space, a radiator fan can really help push that warmth out where you need it. But what about a radiator fan app? A way to track your fan’s activity right from your phone, so you can see when it’s running and for how long? It sounds like a neat idea, right?

    I’ve been curious about this myself recently. Traditionally, radiator fans are straightforward devices—simple and practical. They sit atop or near your radiator and gently blow warm air into the room, helping to even out temperature and heat up those chilly corners faster. These fans come in many brands, with SpeedComfort being one popular choice. They’re all quite similar in design and functionality, mostly manual or with basic thermostatic controls.

    However, the idea of a “radiator fan app” that lets you monitor your fan’s runtime or schedule it remotely adds a layer of convenience and control that is appealing, especially for someone who likes to keep an eye on energy use. Unfortunately, after a good look around the UK market, there doesn’t seem to be a widely available model that offers this smart feature straight out of the box.

    What Would a Radiator Fan App Offer?

    Imagine a fan that you can connect to your phone via WiFi or Bluetooth. You could check:

    • When the fan is on or off
    • How long it’s been running
    • Set schedules for it to turn on before you get home
    • Receive alerts if it stops working or needs maintenance

    This is quite common with other smart home devices, like thermostats or heaters, but hasn’t yet become standard for radiator fans.

    Why Aren’t There Many Radiator Fans with Smartphone Apps?

    One reason could be simple demand. Radiator fans tend to be seen as low-tech accessories, and manufacturers might not see much value in adding a sophisticated smart control system. Plus, adding connectivity could drive up costs without a clear return for most buyers.

    If you’re looking for a smart heating solution with app control, you might want to explore smart thermostats like Nest or Hive, which can manage your central heating more broadly.

    DIY and Smart Add-Ons

    If you’re handy with tech, you could consider integrating a smart plug or a home automation system that can turn your radiator fan on and off remotely, essentially creating your own “radiator fan app” experience. Devices like those from TP-Link Kasa or Amazon Smart Plug let you schedule and track device usage through apps.

    Final Thoughts on Radiator Fan Apps

    No doubt, a radiator fan app would be a cool gadget to have. For now, though, most of us will have to rely on traditional radiator fans and maybe get creative with smart plugs if we want to add some tech-savvy features.

    If you’re interested in monitoring your cellar heating more closely, combining a classic radiator fan with a smart thermostat or smart plug could be your best bet. It’s a bit of a DIY route, but it gives you control and insight you wouldn’t have otherwise.

    Have you tried any smart heating gadgets in your home? What’s worked for you?

  • Finding the Perfect Very Low Light Small LED Lamps for Cozy Evenings

    Finding the Perfect Very Low Light Small LED Lamps for Cozy Evenings

    How to choose warm, tiny LED lights that fit your evening routine and smart home setup

    When it comes to winding down in the evening, lighting plays a surprisingly big role. I recently found myself on a mission to track down some very low light lamps—small, subtle LED lights that throw a soft, warm glow across shelves, planters, or little nooks around the house. If you, like me, have an evening routine that involves dimming your smart bulbs and craving a cozy, calm vibe, then you’ll know exactly what I mean.

    I wanted something smaller than your typical lamp. Think fairy lights or tiny glass orbs only a couple of inches high, something that adds just enough warmth to be welcoming without blasting out too much brightness. And of course, ideally, these lights should play nice with smart plugs or automation systems.

    Why Small, Very Low Light Lamps Matter for Evening Ambiance

    Having smaller, low-output lights scattered around your space can enhance the mood without overwhelming it. Big overhead lights aren’t great for relaxing—they’re too harsh and too bright. I found that a handful of small LED lights gave me just the softness I needed, making the house feel more inviting as the day ends.

    The Hunt for Tiny LED Lights That Actually Work

    Here’s where things get tricky. There are plenty of fairy lights and mini lamps on the market. But many don’t quite meet the “very low light” criteria or have quirks that make them frustrating:

    • Fairy lights with remotes that dim nicely, but won’t remember settings when power is cut. If you plug them into a smart plug and switch them off and on, they pop back at full brightness, which defeats the purpose.
    • Glass orbs that are bright by default and only dim with their own remote, but again, lose settings after power cycles.
    • Tiny lamps are hard to find, especially ones that can fit low-lumen LEDs and don’t require bulky fixtures.

    For folks wanting to integrate these tiny sources into their smart home (using smart plugs or automation routines), the main issue is that most of these mini lights lack “memory” for brightness levels after power resets.

    What to Look for in Very Low Light Lamps

    Given these challenges, here are some tips if you’re on the lookout for very low light lamps:

    • Memory function for brightness. This is crucial. Without it, your perfectly dim fairy lights or orbs will default to full brightness every time power is restored.
    • Compatibility with your smart setup. If you use smart plugs or hubs, ensure the lights can be controlled remotely or maintain set brightness when toggled.
    • Warm white glow. Cool or blue-tinted LEDs are harsh in the evening. Aim for warm LEDs that create a relaxing atmosphere.
    • Size and style. Since you want them tiny and minimalist, check dimensions carefully. Some miniature LED lamps or fairy lights are designed for decoration and may not suit functional lighting needs.

    Some Options and Ideas Worth Exploring

    While perfect solutions remain rare, here are some approaches that might help:

    • Smart LED candles or flameless tealights: These come in small sizes, offer warm light, and often have better built-in memory settings. Popular brands include those by Yankee Candle, which sometimes feature smartphone app control.
    • Low-lumen smart LED bulbs: Some manufacturers like Philips Hue and LIFX offer very dimmable bulbs that can fit into small fixtures, which you might pair with minimal lamp bodies. Check Philips Hue for compact, dimmable bulbs.
    • Custom setups: If you’re handy, consider combining very low-power LEDs with battery-powered controllers. This can bypass the memory issue entirely since the power is never fully cut.

    Wrapping Up

    If you’re like me, trying to find those very low light lamps that fit a smart home setup and blend effortlessly into your evening vibe, it’s a bit of a treasure hunt. The key is focusing on devices with memory for brightness settings and a warm glow. Keep an eye on candle-style LEDs or look into small dimmable smart bulbs paired with minimalist fixtures.

    Lighting your space softly, with small accent lights, can make those winding-down moments feel that much more special and intentional.

    For more inspiration on smart lighting and evening atmospheres, check out guides from CNET Smart Home and Wirecutter’s lighting reviews.

    I hope this helps light your way to cozy evenings!

  • How to Add a Convenient Wall Switch for Your Kitchen Hood Range

    How to Add a Convenient Wall Switch for Your Kitchen Hood Range

    Easy ways to control your high-mounted hood range — including smart voice options

    If you’ve ever struggled to reach the controls on a kitchen hood range mounted too high, you’re not alone. I recently came across a situation where the hood range was installed about six feet up — just out of comfortable reach. So, how do you make those hood range controls accessible without climbing on a chair every time you want to switch it on or off? Let’s explore how to add a wall switch that lets you control your hood range easily, and even how to take it a step further with smart home voice commands.

    Why Add Hood Range Controls to a Wall Switch?

    Having your hood controls up high can be annoying. You don’t want to stretch or find a stepping stool every time you cook. A wall switch placed lower down can solve this problem quickly. Plus, it’s safer because you avoid reaching near heat or hot surfaces.

    The Simplest Way to Add a Wall Switch for Hood Range Controls

    First things first: is it possible? Yes! The simplest method is to tap into the existing wiring of the hood range controls and extend it to a switch mounted at a reachable spot on your kitchen wall.

    Here’s a quick overview:
    Locate the wiring: Identify the wires connected to the hood range controls. Usually, these are low-voltage and part of the control circuit.
    Choose the right switch: A simple ON/OFF switch rated for the hood’s control voltage will work. Avoid high-voltage switches unless you’re sure about the wiring.
    Run the wiring: Extend wires from the hood control to the new switch location. This may require fishing cable through walls or conduits.
    Connect and test: Wire the new switch in parallel or series as appropriate and test to ensure the hood responds correctly.

    If you’re not comfortable with electrical work, consulting a licensed electrician is the safest bet. Improper wiring can cause damage or be a safety hazard.

    Making It Smart: Voice Control Options for Your Hood Range Controls

    Now, for those of us who love tech, adding a voice command feature is an exciting option. Imagine saying, “Hey Siri, turn on the hood range,” while your hands are busy cooking.

    How to do this?
    Smart switches: Replace the manual wall switch with a smart switch compatible with your voice assistant like Siri, Alexa, or Google Home. Brands like Lutron Caséta or TP-Link Kasa offer switches that work with voice control.
    Smart plugs: If your hood range plugs into an outlet, a smart plug could work if the hood powers on/off simply by plugging/unplugging. This isn’t common, but worth checking.
    Home automation hubs: Integrate the control into a smart home system that can send commands to the hood range.

    Remember, not all hood ranges will function correctly when controlled remotely without specialized adapters. The manufacturer’s documentation is useful here; some brands may offer smart control modules or apps.

    Final Thoughts

    Adding hood range controls to a more accessible wall switch is often simpler than you’d think and can make a big difference in daily kitchen convenience. And if you enjoy smart home gadgets, turning that setup into a voice-controlled system can be the cherry on top.

    For more detailed electrical instructions, checking resources like This Old House Electrical Guide is helpful. Also, manufacturers’ websites often have wiring diagrams and smart accessory info. For smart home ideas, CNET’s Smart Home section is a good spot.

    I hope this gave you some clear ideas on how to make your hood range controls easier to reach and even smarter. Cooking just got a little more comfortable!

  • What to Do When Your Old Apartment’s Light Switch Has No Ground Wire

    What to Do When Your Old Apartment’s Light Switch Has No Ground Wire

    A simple guide to safely updating light switches in older homes with no grounding

    If you’ve ever tried to replace a light switch in an older apartment, you might have run into a bit of a puzzle: the new switch has a green ground wire, but your old setup doesn’t seem to have any ground at all. I recently faced this exact situation, and I want to share what I learned about how to handle a light switch ground wire question safely and effectively.

    Understanding the Light Switch Ground Wire

    The green or bare copper wire in newer electrical devices is typically the ground wire. Its job is to safely direct any unwanted electrical current away from people and into the earth, preventing shocks and electrical fires. However, in many older apartments, the wiring might not include a dedicated ground wire, especially in walls that haven’t been updated.

    Spotting the Ground in Older Wiring

    When you look behind your old light switch, you might see just two wires (hot and neutral) and perhaps a bare copper wire that’s not connected. This bare copper wire is often the grounding path, but it might not be attached to the switch if the switch box isn’t grounded.

    What Should You Do If There’s No Ground Wire?

    1. Check the Electrical Box: Metal boxes often act as grounding conductors if properly connected to grounded wiring. If your box is metal and connected to a grounding wire, you can attach the ground wire from the new switch to this box.

    2. Test the Box for Ground: Use a multimeter or continuity tester to see if the metal box is grounded. If it’s not, relying on it for grounding isn’t safe.

    3. Use a GFCI Switch: If no ground is available, consider installing a GFCI (Ground Fault Circuit Interrupter) switch instead. GFCI switches don’t rely on grounding to protect you, making them a great safety upgrade in older homes.

    4. Consult a Professional: When in doubt, talk to a licensed electrician. They can assess your home’s wiring and recommend the best, safest approach.

    Why You Shouldn’t Just Ignore the Ground Wire

    Leaving a ground wire unconnected or trying to bypass it can be dangerous. It exposes you to electrical shock and might violate local electrical codes. The ground wire is there for a reason, and respecting that is key to home safety.

    Wrapping It Up

    Replacing light switches in older apartments is doable, but you have to pay attention to grounding. A green ground wire without a proper ground point needs careful consideration. Either connect it to a grounded metal box, install a GFCI switch, or get expert help.

    Remember, safety first! Here are some useful resources if you want to dive deeper:

    Feel free to share these tips if you’re facing the same question or want to help a friend who’s updating lights in an older place. It’s always good to be informed before you start poking around the electrical box!

  • Rethinking Home Inventory Apps: Adding Real Value With Smart Automation

    Rethinking Home Inventory Apps: Adding Real Value With Smart Automation

    Why home inventory apps need more than just tracking stuff—they need useful automation people will actually use

    If you’ve ever tried to keep track of all the stuff in your house, especially appliances, you know how quickly it can get overwhelming. That’s where a good home inventory app comes in handy. The idea sounds simple: help you list, organize, and store details about your belongings, maybe even for insurance purposes. But the truth is, a home inventory app with just those features often isn’t enough to keep people using it for the long haul.

    I’ve been thinking a lot about how these apps can do more—specifically around home task automation that actually brings value beyond just logging your things. Preventative maintenance tasks for your appliances could be the key to this. Think of it as the app not only reminding you what you own, but actively helping you take care of it so nothing breaks unexpectedly.

    Why Traditional Home Inventory Apps Don’t Stick

    Most apps in this space focus heavily on documenting your possessions. That’s great for insurance claims after something bad happens, but that’s usually a rare scenario for most users. After entering all your items, people often stop using them because they don’t see ongoing benefits.

    So, how do we transform a home inventory app into something more engaging? One way could be to build features around ongoing home maintenance—like reminders for changing your water filter, cleaning the dryer vent, or scheduling HVAC check-ups. These are real tasks that would help keep your appliances running longer and your home safer.

    Making Home Task Automation Actually Useful

    The challenge? People hate chores, so any automation offered has to be completely intuitive, useful, and not add extra work. The best home task automation in a home inventory app would be subtle but reliable:

    • Automated alerts based on appliance warranty and usage data
    • Simple checklists for common maintenance tasks
    • Integration with calendar apps or smart home devices
    • Helpful tips or tutorial videos on appliance care

    By embedding these features seamlessly, the app could become more of a helpful assistant rather than just a digital storage space.

    Are People Looking for This?

    That’s a good question and one that anyone building such a product has to ask. According to Statista, home automation is a growing trend, but most people stick to lighting and security systems. Appliance and home maintenance automation apps are still niche, but there’s growing interest.

    Moreover, site like Consumer Reports emphasize the importance of preventative maintenance to prolong appliance life and save money. This reveals there’s definitely some market need, provided the app nails usability and genuinely reduces the hassle involved.

    What Makes a Home Inventory App Worth Using?

    At its best, a home inventory app can become a trusted helper, reminding you of tasks that keep your home running smoothly and protecting your investments. To get there, developers need to:

    • Focus on real, actionable maintenance help—not just inventory
    • Make onboarding and task management frictionless and clear
    • Provide value through smart timing and meaningful notifications

    If done right, a home inventory app can evolve from a one-time setup chore into an essential part of home management.

    For those looking for inspiration or tools, you might check out the Home Maintenance Schedule by The Spruce or even automation apps like IFTTT that let you create smart alerts and workflows.

    Final Thoughts

    Building a successful home inventory app means going beyond just storing what you own. It’s about offering a helping hand to take care of those things so users stick around and find real value in the app every day. Prevention through home task automation isn’t just smart—it’s what could keep these apps alive and useful in the long run.

    So next time you’re thinking about your appliances or home gadgets, maybe an app that actually reminds you to care for them might be exactly what you need.