Category: AI

  • Smart Locks for Two Front Doors: What’s the Best Setup?

    Smart Locks for Two Front Doors: What’s the Best Setup?

    Navigating Smart Lock Options for a Home with a Regular and Steel Security Door

    If you’ve got two front doors—a regular one and a steel security door with different types of locks—you might be wondering how to simplify access with a smart lock. The challenge is real: a typical smart lock usually replaces just one lock type, and when you have a deadlock on one door and a euro cylinder lock on the other, it’s not as straightforward as it sounds. So, what’s the best way to set up a smart lock front door scenario that covers both?

    Understanding Your Door Locks

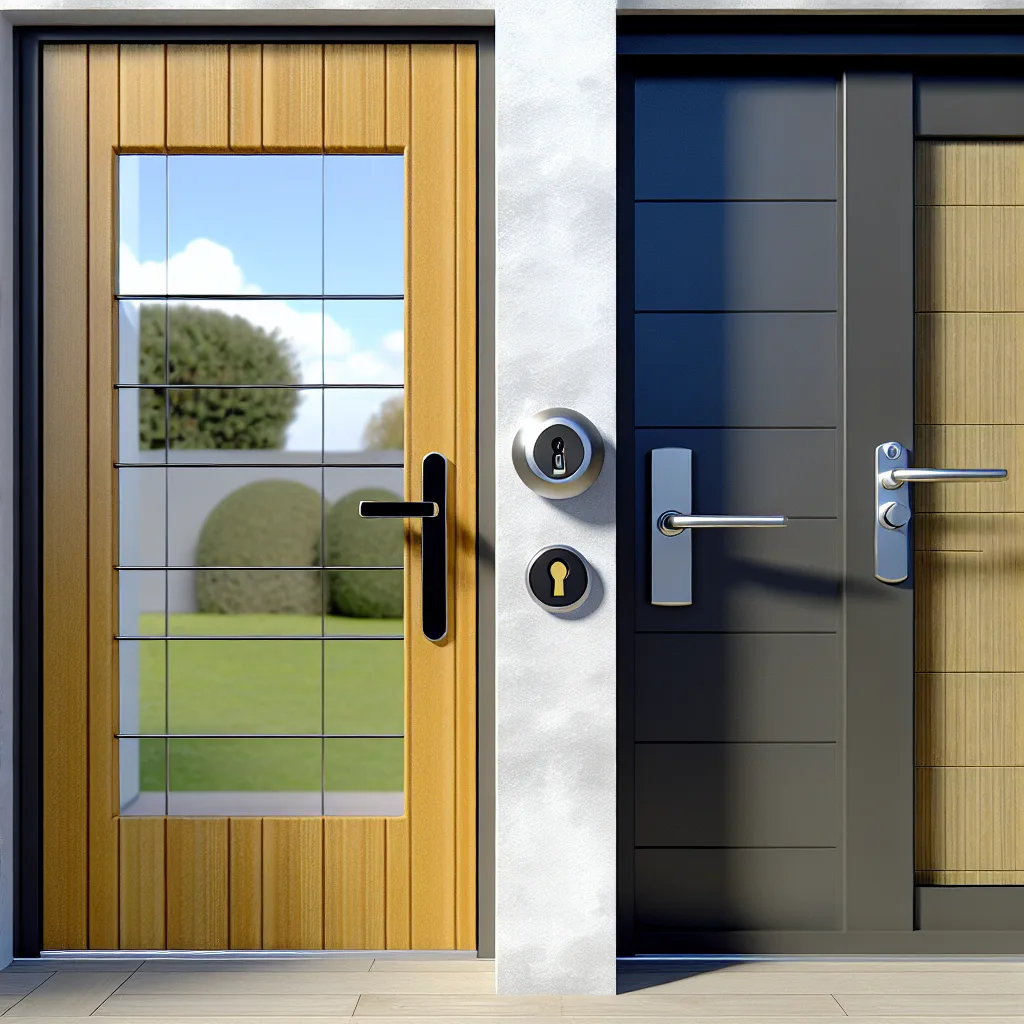
    First off, let’s get clear on the types of locks you have. A deadlock is what you usually find on a standard front door—it locks your door securely and is often replaced by smart locks easily. The steel security door, on the other hand, often has a Euro cylinder lock, which functions a bit differently and can be more complex to replace.

    Can One Smart Lock Replace Both?

    It’s tempting to look for a one-size-fits-all solution—a smart lock that can replace both your deadlock and the euro cylinder on the security door. Unfortunately, this isn’t common. Most smart lock models are designed to replace specific lock types only. While some advanced systems let you remotely control multiple points, the physical replacements usually remain specialized.

    That means if you want the convenience of smart access, you might end up installing a smart lock on the deadlock and keeping the security door locked or unlocked by key as needed. This can actually work well in practice: use the smart lock for daily entry and exit, and rely on the steel door’s security for when you need an extra layer of protection.

    What Are Your Options for a Smart Lock Front Door?

    • Smart Lock for Deadlock Only: The most straightforward approach. This lets you control your main entrance smartly without messing with the more complex security door lock.
    • Upgrading Both Doors Separately: Some brands offer smart locks for Euro cylinder locks—these can be installed on your security door, but compatibility and installation may be more involved than with a simple deadlock.
    • Smart Multipoint Locks: There are multipoint locking systems but integrating those with existing security doors isn’t always feasible unless you’re doing a full door replacement or significant retrofit.

    Tips Before You Decide

    1. Check the Lock Compatibility: Measure your locks and read up on whether your preferred smart lock supports your existing lock types. Manufacturer websites like August or Yale are a great place to start.
    2. Think About Daily Use: If you mainly use the deadlock, it might not be worth the hassle to convert the steel door’s lock right away.
    3. Consider Security Needs: Some might prefer to keep the steel door locked traditionally as an additional security layer, which isn’t a bad idea.
    4. Professional Installation: Especially with steel and multipoint locks, a professional locksmith familiar with smart locks could save time and avoid damage.

    Wrapping It Up

    When it comes to a smart lock front door with two different locks, a balanced approach usually wins. Start with a smart lock on your main deadlock for convenience and leave the steel security door as is for maximum security and peace of mind. Down the road, you can explore smart options specifically built for euro cylinder locks if you want full smart access control.

    For more on smart lock types and security tips, check out This Old House’s guide to smart locks, and the latest advice from Consumer Reports.

    Getting the right smart lock front door setup isn’t just about tech—it’s about what works best for your home and your lifestyle. Take your time, and you’ll find a solution that fits just right.

  • Choosing the Right Home Automation Hub: ZigBee, Matter, or Z-Wave?

    Choosing the Right Home Automation Hub: ZigBee, Matter, or Z-Wave?

    Understanding What Hub to Pick for Your Smart Home Setup

    If you’re like me and invested in a smart home setup, you’ve probably come across the frustration of device ecosystems that don’t quite play nice—especially when it comes to your home automation hub. Recently, I had to replace most of my smart bulbs and re-think my entire setup after my old ZigBee system, specifically the Sengled brand, basically stopped working. The official app and Alexa skill were discontinued, and support went silent. This pushed me to research alternatives like Matter hubs, Z-Wave, and how to keep the IP addresses on my network low while still getting reliable smart home control.

    What’s a Home Automation Hub Anyway?

    Think of a home automation hub as the central brain that helps all your smart devices communicate. Some devices connect through WiFi or Bluetooth, which your Alexa or Google Assistant can control directly. Others, like ZigBee or Z-Wave devices, usually require a dedicated hub to act as a signal relay and manager. The aim is to keep your network stable without overwhelming your WiFi router with too many connected devices.

    ZigBee: What Went Wrong?

    ZigBee technology once seemed like the perfect solution for smart bulbs and sensors because it uses low power and creates a mesh network where device signals hop across devices to reach the hub. But many brands, Sengled included, implement ZigBee their own way, making support and compatibility shaky. When Sengled’s Alexa skill disappeared, and their app stopped working, it left me stuck with bulbs that weren’t smart anymore.

    The Matter Protocol: What Is It and Do You Need a Hub?

    Matter is a newer smart home standard designed to improve device compatibility across brands and platforms, promising encrypted data and IPv6 support. Sounds great, right? But here’s where it gets confusing.

    Does Matter need a hub? Not necessarily. Many Matter devices operate over WiFi or Thread (a low-power, mesh protocol). However, some setups still need a Matter hub or bridge to connect older or less common devices to your network or to bridge Thread devices to your WiFi router.

    ELI5: Why Would You Want a Matter Hub?

    Imagine your Matter hub isn’t an independent WiFi access point but more like a translator or gateway speaking different device languages. It doesn’t replace your WiFi router but helps devices talking Thread or ZigBee connect seamlessly with WiFi gadgets and your smart assistants.

    What About Z-Wave?

    Z-Wave is another wireless standard mostly used in smart home gear. It, too, requires a dedicated hub. It’s a mature technology with good mesh networking capabilities but less commonly used in lighting than ZigBee or WiFi bulbs. Some users prefer Z-Wave for security and reliability.

    Keeping Your IP Addresses in Check

    One big reason I moved away from WiFi-heavy setups is to avoid clogging my router with too many IP-assigned devices. ZigBee and Z-Wave devices don’t need unique IP addresses because they communicate through the hub, which acts as the network bridge.

    So, What Should You Pick?

    • If you want broad compatibility and are starting fresh, Matter-compatible devices paired with a hub (or bridge) are a reasonable bet. The ecosystem is still growing, and many big names support it.
    • If you value mature tech with great mesh support and want to minimize IP usage, Z-Wave hubs are still solid choices.
    • If you’re committed to ZigBee, consider brands known for solid support and wide compatibility, like Philips Hue.

    Final Thoughts

    Choosing the right home automation hub boils down to what devices you want, how much you want to manage IP addresses, and how much future-proofing you’re after. Matter shows promise, especially with encryption and interoperability, but you’ll want to check if a hub or bridge fits your particular devices. Meanwhile, Z-Wave still holds its ground for reliable, mesh-based smart home setups.

    For more about Matter and home automation standards, check out Connectivity Standards Alliance’s Matter page and for Z-Wave details, visit the Z-Wave Alliance website. Plus, for practical advice on managing your smart home network, this guide from CNET is a helpful read.

    So, next time you think about upgrading your smart bulbs or home gear, consider the whole picture — compatibility, network traffic, and ongoing support. It’s a balance, but with the right home automation hub, your smart home can be as smart as you want it to be!

  • Getting Your Govee Lights to Play Nice with Home Assistant

    Getting Your Govee Lights to Play Nice with Home Assistant

    Troubleshooting and Tips for Smooth Govee Integration in Home Assistant

    If you’re diving into home automation and recently started using Home Assistant, you might find yourself juggling a few quirks—especially if you’re trying to get your Govee lights working smoothly. I’ve been there too. The good news is, with some patience and a few tricks, you can get your setup humming.

    The Govee lights Home Assistant challenge

    Switching to Home Assistant from another platform like Homey Pro can open up a lot of doors. Suddenly, you’re integrating your AVR, projector, and even specialty devices like Kaleidescape, which was tricky before. But when it comes to Govee lights, the setup path isn’t always straightforward.

    One of the first things you might notice is that Home Assistant lets you connect Govee lights via two main options: local mode or Bluetooth. Local mode scans your Wi-Fi network to find LAN-enabled Govee lights, and it’s fantastic when it works because the response tends to be instant. But what if you have more lights than what the local mode finds? That’s where things get a little complicated.

    Why some Govee lights don’t show up

    If you’re only seeing a handful of your Wi-Fi Govee lights pop up and wondering about the rest, you probably need a better integration. Enter HACS—Home Assistant Community Store. It’s a way to extend Home Assistant’s core capabilities by installing community-built add-ons, including a more robust integration for Govee lights.

    Through HACS, you can get an API key from Govee’s developer portal. That key unlocks access to more of your lights on your network, sometimes even those that don’t appear via standard local discovery. But even with HACS, some devices might not show up right away or might respond sluggishly after adding more lights. It’s often about balancing what the network can handle and how the light firmware interacts with Home Assistant.

    Tips to improve Govee lights integration in Home Assistant

    • Check your network setup: Make sure your Wi-Fi signal is strong and consistent where your Govee lights are. Spotty connections can cause lights to drop off or respond slowly.
    • Use the latest integrations: Install the latest Govee integration via HACS and keep Home Assistant updated regularly.
    • Avoid mixing too many connection types: Sticking to local LAN or API-based control can be more reliable than mixing Bluetooth and Wi-Fi control.
    • Review automation timing: If your automations to turn lights on/off aren’t working well, try spacing out commands or add a retry mechanism.

    Should you switch to standard smart bulbs?

    If you continue facing issues, it’s worth considering whether the bulbs themselves fit your needs. Govee lights offer great colors and effects but can sometimes lag in smart home stability compared to brands like Philips Hue or Lutron switches.

    Lutron switches, for instance, are known for their solid performance and broad compatibility. If your setup revolves around consistent and seamless automation—like turning off lights when a movie starts—you might find switching to more established smart bulb brands and accessories worthwhile.

    Wrapping up

    Getting all your Govee lights working in Home Assistant isn’t always plug-and-play, especially with a mix of local and Wi-Fi devices. Using community tools like HACS, ensuring your network is solid, and being patient with setup can get things working much better. And if it doesn’t, exploring other smart lighting options might save you a headache down the road.

    For more insights and official documentation on Govee and Home Assistant, check out the Govee Developer API page and the Home Assistant Integration Page.

    Give it a try and don’t hesitate to tweak and experiment. Smart home setups are personal projects, after all, and there’s a satisfying buzz when everything finally clicks. Good luck!

  • Choosing the Best Smart Outlet for Your Home: Simple, Safe, and Reliable

    Choosing the Best Smart Outlet for Your Home: Simple, Safe, and Reliable

    How to pick a smart plug system that’s easy to use, handles your holiday lights safely, and won’t bog down your Wi-Fi

    When it comes to outfitting a home with smart technology, one of the most straightforward upgrades is swapping out those old-school remote-controlled plugs for the best smart outlet options. If you’ve ever been overwhelmed by a dozen remotes managing different devices, or worried about the safety of plugging in a bunch of Christmas lights, you’re not alone. I recently went down the rabbit hole of figuring out a smart outlet solution that’s easy to use, safe for higher loads like holiday decorations, and won’t bog down the home Wi-Fi network.

    What to Look For in the Best Smart Outlet

    The best smart outlet for your needs should balance ease of use, safety, and network efficiency. For example, many smart plugs are designed with mobile apps and voice assistants in mind, which means you can consolidate control into one interface and avoid juggling multiple remotes. Safety is key, especially if you want to plug in something like Christmas lights that draw more power. Lastly, it’s crucial that your smart outlets don’t create network lag or overuse your Internet bandwidth.

    Option 1: Z-Wave Smart Plugs

    Z-Wave is a wireless communication protocol tailored specifically for smart home devices. It’s got solid security features and doesn’t use Wi-Fi, which means it won’t slow down your home internet. It’s typically used with a hub, and the devices form a mesh network, which helps extend range and reliability.

    That said, Z-Wave setups can get a bit pricey since you’ll need a compatible hub and often additional accessories. Also, not all Z-Wave plugs clearly state their power ratings, so you want to double-check that they’re rated for your heavier-duty devices, like Christmas lights. Installing in-wall Z-Wave outlets is a neat idea but can be complicated and might require professional installation depending on your home’s wiring.

    To learn more, check SmartThings’ Z-Wave hub options SmartThings Hub.

    Option 2: Google Home and Amazon Alexa Smart Plugs

    These plugs are usually cheaper and very accessible if you already have smart speakers or displays from Google or Amazon. The apps let you group devices so you can hit one button or say a command like “Turn on all the Christmas lights,” which makes life easier.

    The big question is how these plugs might impact your Wi-Fi. While they do connect over Wi-Fi, many newer devices operate on 2.4GHz and do light data duties, so they generally don’t impact internet performance much. However, if you want to isolate these devices, setting up a secondary router or guest network just for smart devices is a solid approach. This keeps your main network free for heavier internet traffic.

    For safety, look out for plugs that have good certifications and can handle higher wattages. Amazon’s Smart Plug and Google Nest Wi-Fi compatible plugs have specifications online you can review before purchase. You can read more about managing devices on secondary networks in guides like this from CNET.

    Making the Choice for Your Home

    If you want a robust, reliable, and secure system and don’t mind investing upfront, Z-Wave might be your best bet. It’s well-suited for bigger smart home projects but can be over the top if you just want simple plug control.

    For a budget-friendly, easy-to-use setup that plays well with mainstream smart home ecosystems, Google Home or Amazon Alexa smart plugs are excellent options. Plus, they let you streamline your mom’s dozen remotes into just one or two apps.

    Before buying, verify the power ratings of the plugs, especially if you’re plugging in holiday lights. And consider setting up a dedicated network segment if Wi-Fi bandwidth is a concern.

    Taking time to match the best smart outlet to your needs can turn your home into a smoother, safer, and less cluttered place. And that’s a win for everyone coming home for the holidays.


    Helpful Resources

    This journey to find the best smart outlet is all about matching your comfort level with tech and your home’s unique setup. Getting the right smart plug means fewer remotes, safer power use, and smart control at your fingertips. Cheers to simpler smart living!

  • How to Wire a 3-Way Mini Smart Module Without Major Changes

    How to Wire a 3-Way Mini Smart Module Without Major Changes

    Keep both your light switches working effortlessly with smart module wiring tips

    If you’ve ever thought about upgrading your home lighting with smart technology but worried about messing up your existing setup, you’re not alone. Especially when it comes to 3-way wiring—where two switches control one light—it can get tricky. The good news is, you can add a mini smart module into your 3-way wiring system without major rewiring or losing functionality on either switch.

    Understanding 3-Way Wiring

    A quick refresher: 3-way wiring lets you control a single light fixture with two different switches, like at either end of a hallway. The classic setup involves traveler wires running between the switches and a common wire connected to the light or power source. This system is a bit more complex than your typical single switch setup.

    Adding a Mini Smart Module to Your 3-Way Wiring

    Mini smart modules are designed to fit inside your switch box behind your existing switches. They wire directly into your setup and allow you to control your lights via app or voice commands. The key question is: can you keep both switches working like normal?

    The answer is yes! Many smart modules support 3-way wiring and allow both switches to continue functioning as usual, alongside smart control features. The wiring usually involves connecting the module’s inputs and outputs to the traveler and common wires carefully.

    Step-By-Step Tips for Wiring Your Mini Smart Module

    1. Turn off the power at the breaker to be safe.
    2. Identify your wires: travelers, common, and ground. Use a voltage tester or multimeter if you’re unsure which is which.
    3. Remove the switch covers and switches from the wall boxes.
    4. Connect the smart module: typically, the module has labeled terminals. You’ll connect it to the common wire and travelers. Some modules come with detailed wiring diagrams for 3-way setups—follow those closely.
    5. Secure all connections and carefully fit the module and switches back into the box.
    6. Restore power and test both switches. They should toggle the light on and off like before.

    Tips to Keep in Mind

    • Double-check the module’s compatibility with 3-way wiring systems.
    • If your switches are dimmers or use a different type of wiring, check the manufacturer’s guidelines.
    • When in doubt, don’t hesitate to contact an electrician to avoid any electrical mishaps.

    Installing a mini smart module in your existing 3-way wiring setup is a great way to modernize your home lighting without the headache of major rewiring. You get the best of both worlds: traditional switch control plus smart features like app control and integration with voice assistants.

    For detailed wiring diagrams and product info, check out Lutron’s Smart Module Installation Guide or Leviton’s 3-Way Wiring Instructions.

    If you want to dig deeper into wiring basics, Electrical4U’s guide on 3-Way Switch Wiring is a solid resource. Upgrading smartly means making sure your setup stays safe and functional, and adding a mini smart module to your 3-way wiring can do just that.

  • How I Built a Solar Water Heater Monitor with LoRa and E-Paper

    How I Built a Solar Water Heater Monitor with LoRa and E-Paper

    A simple, wire-free way to track your solar water heater’s temperature and weather—no WiFi needed.

    If you’ve ever had that frustrating moment standing under a cold shower, wondering if your solar water heater has warmed up enough, this story might resonate with you. I got tired of guessing whether my solar water tank was hot enough or if I needed to switch on the backup heating. So, I decided to build a solar water heater monitor that solves this exact problem, and it turned out to be pretty neat.

    Why a Solar Water Heater Monitor?

    Living with a solar water heater means you’re at the mercy of the sun. Mornings can be tricky if the cloud cover has been dense or if the tank didn’t heat up overnight. Instead of guessing, I wanted a straightforward way to check the status without running wires or depending on my home WiFi, which can be patchy at best. That’s when the idea of a wireless, locally displayed monitor became clear.

    How My Solar Water Heater Monitor Works

    The device I built measures the tank temperature directly with a PT100 industrial sensor, known for its accuracy and durability. Alongside that, it tracks outdoor weather conditions using the SHT30 sensor, so I have a better idea about the environment affecting my system.

    But here’s the cool part: the data is transmitted via LoRa, a low-power long-range wireless tech. It’s super reliable—even through walls—and it doesn’t rely on WiFi or any internet connection. That means less hassle with network issues, no extra wiring to the roof, and you keep your data private unless you decide otherwise.

    Indoors, an always-on e-paper display shows both the water tank temperature and current weather. E-paper is perfect here because it uses almost no power and is easy on the eyes. The battery life? Over a year per unit.

    For the Tech Curious: Optional Cloud Dashboard

    While I like keeping things local, there’s an optional cloud dashboard powered by Grafana for those who want alerts, historical data, or remote access. It’s not required, so if you prefer local-only setups, you’re good to go without any cloud dependency.

    Thinking About Integrations and Features

    I’m currently testing the setup, and it’s close to being ready for others to use. I’ve been thinking about integrating it with popular smart home hubs like Home Assistant, which would let you automate your heating systems further or receive custom notifications.

    Also, I’m torn between focusing on enhancing the cloud dashboard or improving local features. Both have great benefits depending on your preferences for privacy and connectivity.

    Why This Matters

    This project isn’t just about tech for tech’s sake. It’s about adding a bit more comfort and confidence to everyday life. No more stepping into unexpectedly cold showers or wondering if it’s worth switching on the backup heater. Plus, it’s a neat way to better understand your solar energy system’s performance.

    If you’re interested in building something like this or just want to learn more about LoRa and solar heating sensors, check out PT100 sensors at Omega Engineering and SHT30 sensor details at Sensirion.

    For more on LoRa technology and how it’s used in home automation, Semtech’s site is a good reference: Semtech LoRa Overview.

    This little project has made my daily routine easier and more predictable. Plus, it’s great fun to tinker with smart home tech that actually solves real problems.


    If you’re curious about the idea or want to keep updated, there’s a demo video available and an early signup page for launch coming soon. Feel free to explore and maybe give it a try yourself!


    Summary

    Building a solar water heater monitor with an e-paper display and LoRa connectivity is a simple, effective way to keep tabs on your tank’s heat and weather conditions without WiFi or cloud dependency. It’s battery friendly, privacy conscious, and potentially very useful if you rely on solar water heating.

    No more cold showers—just a bit more peace of mind.

  • Building a Configurable Stereo Preamp That Fits Your Tape Loop Needs

    Explore how a DIY stereo preamp can simplify source switching and tape loops for audio enthusiasts

    If you’re like me and enjoy tinkering with audio gear, you might have faced the frustration of your home audio setup not quite cutting it. I recently dove into building a configurable stereo preamp to handle my source switching needs and tape loops — it’s been a solid way to get exactly what I want without relying on a standard receiver that falls short. Let me walk you through the idea and how it might help if you’ve got multiple cassette decks and tape setups like I do.

    What’s a Configurable Stereo Preamp and Why Build One?

    A configurable stereo preamp is basically a smart audio switch that lets you choose your input sources and manage various outputs with detailed control. In my case, my Denon receiver struggled with tape loops — it had two, but I couldn’t record from one to the other, which was a major limitation since I use two cassette decks, a reel-to-reel (RtR) recorder, and even a Sonos Connect box. I wanted something more flexible.

    The Audio Matrix Idea

    I found an old Précis DSP 18×18 audio matrix switch. It’s a beast with no front panel controls and only a serial port for interfacing. The challenge was to turn it into the configurable stereo preamp I needed for full routing control of my audio sources and tape loops.

    After setting up the audio components and outputs in a web-based configuration screen, the system became exactly what I wanted — no more, no less. The main output now includes volume, tone controls, and balance adjustment. For each tape loop added, a dedicated record panel pops up with controls for monitoring, enabling recording, and routing record sources.

    How Do You Use It?

    The system currently runs on a headless Raspberry Pi Zero 2, but you could run it on any computer capable of running Node.js 18 or 20 with a serial port connection. What’s neat is the interface is web-based, with an API available, so you can control everything easily from any device on your network. I’m considering adding physical hardware controls to make it feel even more tactile and immersive.

    Why This Matters

    If you’re juggling multiple audio sources and want precise control over how they interconnect, especially with tape loops and recording paths, this kind of configurable preamp is a neat DIY solution. Imagine the ability to switch sources instantly and manage recording paths without wrestling with your receiver’s limited features.

    Getting Started and Additional Resources

    Wrapping Up

    Building a configurable stereo preamp might seem daunting at first, but it’s a rewarding project if you have specific audio routing needs and want to bypass standard receiver limitations. It’s all about crafting the setup that makes your audio gear work for you. If you’ve got tape decks, reel-to-reel machines, or just want more control over your sources, this is worth exploring.

    If you’re curious, I’m considering making a video demo and maybe open-sourcing the project—would that be something you’d be interested in? Feel free to share your thoughts!

  • Setting Up a Secure Home Lab for Your Game Server

    A friendly guide to home lab setup with game servers, Docker, and smart network management

    If you’re new to home lab setup like me and want to host a game server to play with friends, it can feel a bit overwhelming. But don’t worry — I recently went through this process and learned some practical tips that I’d love to share.

    One of my main goals was avoiding VPN services for remote access. I tried Tailscale once but couldn’t recall the details or feel fully comfortable using it again, so I focused on port forwarding instead. To keep things secure, I decided to isolate my server on a separate subnet. That means while most of my devices are on something like 192.168.1.x, I put the game server on 192.168.5.x. This helps add a layer of protection between the server and my everyday devices.

    Running Caddy and Your Game Server Together

    I chose to run both my game server and my reverse proxy (using Caddy) on the same machine — an old PC saved from retirement — entirely inside Docker containers. Docker made it super easy to manage and update the services without messing with my main system. Running them together simplifies the setup and avoids extra network hops.

    If you’re unfamiliar, Caddy is a web server that works great as a reverse proxy, helping to route internet requests to your game server securely. Since it automatically manages HTTPS certificates, it’s a solid choice for this role. You can check out Caddy’s official site for more details on setup options: https://caddyserver.com/docs/.

    Using Pi-hole and Unbound for Cleaner Network DNS

    I also wanted better DNS control, so I set up Pi-hole paired with Unbound on a Raspberry Pi 4. The key for me was routing only my main subnet (192.168.1.x) through this DNS filtering system while letting the isolated game server subnet manage its own traffic separately. This way, my regular devices get ad-blocking and security benefits without complicating the game server’s network.

    To do this, you configure your main router to point the main subnet devices’ DNS to the Raspberry Pi’s IP running Pi-hole. You avoid routing the isolated subnet’s DNS traffic there by not changing its DHCP settings. This strategy keeps the network clean and segmented. The official Pi-hole docs offer great help here: https://docs.pi-hole.net/.

    Migrating Caddy to the Raspberry Pi

    I wondered if moving the Caddy container from the game server’s PC to the Raspberry Pi would help. This means the Raspberry Pi would be the reverse proxy, directing internet traffic only to my server subnet.

    It’s doable, yes, but understand this adds another layer between your subnets. It’s basically another network “passage.” Depending on your routing and firewall setup, this could introduce more complexity or potential traffic bottlenecks.

    I’d recommend trying the simpler approach first (running Caddy and the game server together) and only migrate if you find a clear reason to. Both Raspberry Pi and PC setups have pros and cons; the Pi is low power and always on, but your game server PC likely has more horsepower.

    Final Thoughts on Home Lab Setup

    Setting up a home lab to host a game server involves balancing easy access, performance, and security. Using Docker containers keeps services cleanly managed. Isolating the server on its own subnet adds a nice security buffer. And tools like Caddy, Pi-hole, and Unbound help with secure connections and cleaner network traffic.

    If you’re just getting started, focus on one thing at a time: get the game server up, manage port forwarding carefully, then add DNS filtering and reverse proxy components as you grow comfortable. It’s a fun project that teaches a lot about networking and system management.

    For more on setting up your home lab network with VLANs and subnetting, Network Computing has some great beginner-friendly primers: https://www.networkcomputing.com/network-security/vlans-explained.

    Remember, take your time, keep backups of your configurations, and don’t hesitate to ask for help from the community forums or trusted online guides. Happy hosting!

  • Choosing the Right Router for VLAN and Wi-Fi Needs

    Choosing the Right Router for VLAN and Wi-Fi Needs

    How to pick a router with VLAN support and built-in Wi-Fi for your home lab and remote work setup

    If you’ve started dabbling in mini PCs, home labs, or preparing for a new work-from-home gig, you might have encountered a networking puzzle: how to find a router with VLAN support that also has built-in Wi-Fi? This problem popped up for me recently, and I thought it’s worth sharing what I learned.

    Why Router VLAN Support Matters

    Let me explain VLANs first. VLAN stands for Virtual Local Area Network—a way to split your network into separate segments, isolating devices from each other for security, organization, or traffic management. Let’s say you want to run some mini PCs on their own network segment and also create a separate VLAN for your new work-from-home job. This keeps work traffic separate from personal devices, which is great for security.

    The catch? Many residential internet modems and routers—especially the ones provided by ISPs—don’t support VLANs. I was using a regular Xfinity modem/router, and found out it doesn’t handle VLAN tagging. That was a blocker for me.

    What to Look for in a Router with VLAN Support

    You want a router that can:

    • Handle VLAN tagging on its interface
    • Offer reliable Wi-Fi coverage for your home without needing additional access points
    • Be compatible with any switches you might add later (like a Cisco switch if you want to keep your CCNA skills sharp)

    Some routers have these features built-in, but the options can be overwhelming.

    Router Recommendations for VLAN Support and Wi-Fi

    1. Ubiquiti UniFi Dream Router (UDR) – A solid choice combining VLAN support and strong Wi-Fi, plus easy management through their app. UniFi gear is popular in prosumer and even professional setups. Check Ubiquiti’s website

    2. MikroTik Routers – Known for their advanced networking features including VLANs. They have a steep learning curve but offer great flexibility. Learn more on MikroTik’s site

    3. Cisco Routers (Small Business Series) – If you want to stick with Cisco gear to stay familiar with their ecosystem, look for small business models that include Wi-Fi and VLAN support. These tend to be pricier but reliable.

    4. TP-Link Omada Routers – They support VLAN tagging and are budget-friendly with good Wi-Fi capabilities. Management through Omada Controller software helps keep everything organized. More about TP-Link Omada

    Switch Compatibility

    Since VLANs often extend beyond just the router—especially if you want nearby wired connections for your mini PCs—you might want a managed switch that supports VLANs. Cisco switches are a great choice for practice and compatibility. Other brands like Netgear and TP-Link also have decent managed switches at various price points.

    Wrapping It Up

    Finding the right router with VLAN support and decent Wi-Fi isn’t complicated once you know what to look for. Make sure your router can handle VLAN tagging, offers solid Wi-Fi for your home, and matches the switch gear you plan to use. This way, you can keep your home lab isolated and your work-from-home setup secure.

    For more info on VLANs, Cisco’s official documentation is handy: Cisco VLAN Guide.

    Hope this helps if you’re in the same boat figuring out your router situation. Sometimes the right gear just makes all the difference.

  • Thinking Twice About the Meross Smart Plug Mini? Here’s What You Should Know

    Thinking Twice About the Meross Smart Plug Mini? Here’s What You Should Know

    When buying smart plugs with power monitoring, the Meross Smart Plug Mini might not be all it seems—let’s dive into the truth behind its features.

    If you’re like me, keeping tabs on how much energy your devices use is one of the big reasons you might look at smart plugs. The idea of being able to track power usage from your phone sounds pretty handy, right? That’s exactly why the feature of smart plug power monitoring usually catches my eye. Recently, I had my hopes set on the Meross Smart Plug Mini because the product description promised it could measure power consumption.

    But here’s the thing: once I got it and hooked it up to my home automation system with Matter support inside Home Assistant (HA), I noticed something was missing. There was no “power” entity or any way to view the real-time energy use through the system itself. That felt like a letdown.

    Upon a closer look back at the product page on Amazon, I found a crucial detail buried in the fine print—this power monitoring only works if you use the Meross app directly, which means signing up for a Meross account is a must. So, if you want a straightforward plug-and-play experience with your own smart home setup, you might hit a wall here.

    What Does This Mean for Smart Plug Power Monitoring?

    When you’re shopping for a device to monitor electricity use, it’s tempting to trust the main features listed upfront. But manufacturers sometimes limit functionality to their own apps to keep users tied into their ecosystem. It can be frustrating because the plug’s hardware can do power monitoring, but if the data stays locked in the Meross app, it defeats the purpose for those wanting an integrated experience.

    Returning or Sticking With It?

    If you want to avoid creating yet another account just to use one feature, returning the plug might be sensible. Alternatively, if you don’t mind juggling another app, the Meross app does provide the data you need. Just remember that the info won’t flow naturally into other smart home platforms without extra steps.

    Alternatives Offering Better Integration

    If integrated power monitoring is key for you, some smart plugs come better equipped for this:
    TP-Link Kasa Smart Wi-Fi Plug: Supports energy monitoring and works well with third-party smart home hubs and apps.[1]
    Aeotec Smart Switch 7: Compatible with Z-Wave systems and offers detailed power consumption reporting.[2]
    Shelly Plug S: Known for local control options and open API for direct integration.[3]

    A Quick Buyer’s Tip

    Before you make your purchase, double-check if the power monitoring feature works natively with your existing smart home system or if it locks you into using a specific app and account. This tiny step could save you from surprises later.

    Wrapping Up

    The Meross Smart Plug Mini isn’t a bad device by any means. It just might not be the best choice if your priority is seamless smart plug power monitoring that integrates directly with your home automation platform. Know what you’re getting—and what you’re not—before you buy. That way, you’ll get the smart plug that truly fits your needs.


    References:

    [1] TP-Link Kasa Smart plugs official site: https://www.tp-link.com/us/kasa-smart/

    [2] Aeotec Smart Switch 7 product details: https://aeotec.com/z-wave-plug-in-switch/

    [3] Shelly Plug S information page: https://shelly.cloud/products/shelly-plug-s-smart-home-automation/

    Feel free to share your own experiences or tips on smart plugs and power monitoring in the comments below!