Struggling to find a compact enclosure for your mini PC cluster? Explore clever, space-saving solutions beyond server racks and 3D printing for your homelab.
So, you did it. You finally pulled the trigger on a few of those sleek, powerful mini PCs. Maybe you got a great deal, or maybe you, like me, just had that itch to build something new and dive deeper into the homelab world. You’ve got these little boxes of potential—a Proxmox cluster in the making—ready to replace your old, noisy desktop tower.
It feels great, right? The hardware is sitting there, gleaming on your desk. But then comes the question that stops the project in its tracks: Where do you actually put them?
This was exactly where I found myself recently. I had three shiny new Minisforum PCs, but my “office” is a converted pantry. Space is a luxury I don’t have. I needed a way to stack or organize them that wasn’t a giant, space-hogging server rack. And I don’t own a 3D printer, so printing a custom mount was out.
I figured finding a simple case or stand would be easy. I was wrong. The search for the perfect, compact, non-rack enclosure for a mini PC cluster is surprisingly tough.
The Problem: Finding a Home for Your Homelab
Most of the solutions out there seem to fall into two camps: massive rackmounts or custom 3D-printed brackets.
Rackmounts are fantastic if you have a dedicated server closet or a basement with plenty of room. But for those of us working out of a small corner, a 10-inch rack, let alone a full-sized one, just isn’t practical. It’s overkill and eats up precious desk or shelf space.
The 3D printing community has come up with some brilliant designs, and if you have a printer, you’re golden. But for the rest of us, it feels like being left out of a club. You can see the perfect solution on Thingiverse, but you have no way to make it.
So, what’s the alternative? How do you create a clean, organized, and space-efficient mini PC cluster without a rack or a 3D printer?
Thinking Outside the (Server) Box
After a lot of digging, I realized I needed to get creative. The perfect off-the-shelf product might not exist, but there are plenty of clever workarounds and niche vendors who can help.
Here’s what I found.
1. Vertical Stands and Desk Organizers
This is the simplest and often cheapest solution. Instead of laying the mini PCs flat and stacking them (which can be bad for airflow), stand them on their sides.
- Laptop Stands: A simple vertical laptop stand can often hold two or even three mini PCs snugly. Look for the adjustable kind that lets you set the width of the slots. It keeps them upright, separated for good airflow, and minimizes their footprint.
- Metal File Sorters: Hear me out. A sturdy, metal mesh file sorter or letter organizer from an office supply store can work wonders. They are designed to hold heavy files, have built-in dividers, and offer fantastic ventilation. They’re cheap, easy to find, and surprisingly effective. I saw one person using a bamboo dish rack—it looked great and did the job perfectly.
The key is to measure your mini PCs and check the dimensions of the organizer. As long as it’s stable and allows air to move, you’re good to go.
2. Specialized Etsy and Small Vendor Mounts
While mainstream sites might let you down, there’s a whole world of small businesses and individual makers who cater specifically to the homelab crowd. Etsy is a goldmine for this stuff.
Many sellers on Etsy offer 3D printing services. You can find a design you like on a site like Thingiverse, and have an Etsy seller print and ship it to you. This gives you the customization of 3D printing without needing to own the hardware.
There are also vendors who have designed their own mounting systems. I’ve seen small, laser-cut acrylic stands and metal brackets designed specifically for popular mini PC models from brands like Minisforum, Beelink, and Intel NUC. These are often made by fellow enthusiasts who ran into the same problem you are. A quick search for “[Your Mini PC Model] stand” or “NUC cluster mount” on Etsy or Tindie might just reveal the perfect product.
3. The DIY (No 3D Printer) Approach
If you’re even slightly handy, you can build something custom without any complex tools.
- Wood or Acrylic: A small plank of wood and a few dowels can become a simple, effective vertical rack. Drill holes for the dowels, and you have a custom-sized rack that holds your PCs perfectly spaced for airflow. You can do the same with a sheet of acrylic for a more modern, transparent look.
- Pegboard: A small pegboard mounted to the wall or even just propped up on your desk is incredibly versatile. You can use standard pegboard hooks and shelves to create a modular mounting system for your mini PCs, power bricks, and cables. It’s a great way to go vertical and keep your desk clear.
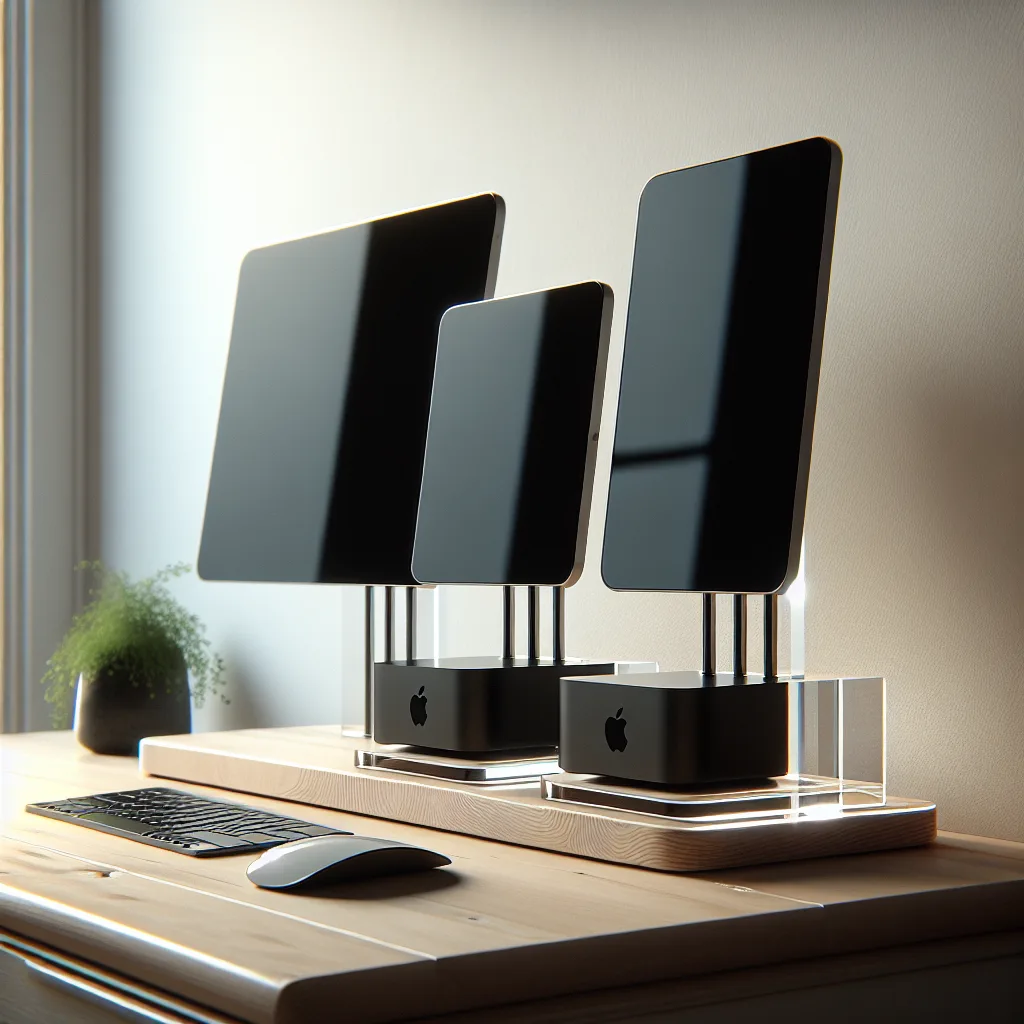
My Final Setup
In the end, I found a seller on Etsy who made a simple, elegant acrylic stand designed to hold three Minisforum PCs vertically. It cost a little more than a metal file sorter, but it was custom-made for my exact models and looks fantastic in my tiny pantry office. It keeps the PCs secure, airflow is great, and the footprint is smaller than a single textbook.
The journey to find it was a bit frustrating, but it taught me that for homelabbers, sometimes the best solution isn’t the most obvious one. It’s about looking in the right places and thinking a little differently. Your perfect mini-cluster home is out there—it just might not be in a server rack.