How a simple DIY project can finally bring some peace and quiet to your home server setup using smart fan control.
If you run a homelab, you know the sound. It’s that constant, underlying hum of server fans that becomes the soundtrack to your house. For a while, I just accepted it as the price of admission for having a powerful setup at home. But then it started to get to me. I knew there had to be a better way than a simple on/off switch, which is what led me down the rabbit hole of smart fan control. It turns out, you don’t need an expensive commercial unit to solve the problem.
My homelab lives in my office, which means I share a room with it all day. The noise from the 40mm fans in my 1U server wasn’t just background noise anymore; it was a distraction. They were either screaming at 100% speed or completely off, letting the temperatures climb higher than I was comfortable with. I wanted something smarter—a system that could keep things cool when necessary but stay whisper-quiet the rest of the time.
Why Bother with Smart Fan Control?
You might be thinking, “Aren’t fans supposed to be loud?” Well, yes and no. Server fans are designed to move a massive amount of air in a tight space, but they don’t need to run at full tilt all the time. Most consumer motherboards have built-in fan control, but server hardware often prioritizes cooling over quiet operation.
The goal of a good smart fan control system is to find the perfect balance. It should:
* Monitor component temperatures in real-time.
* Increase fan speed when the system is under load (like when it’s transcoding media or running a virtual machine).
* Decrease fan speed when the system is idle to reduce noise and power consumption.
This way, you get the cooling you need, right when you need it, and peace and quiet the rest of the time.
My DIY Approach: The “Pankha” Project
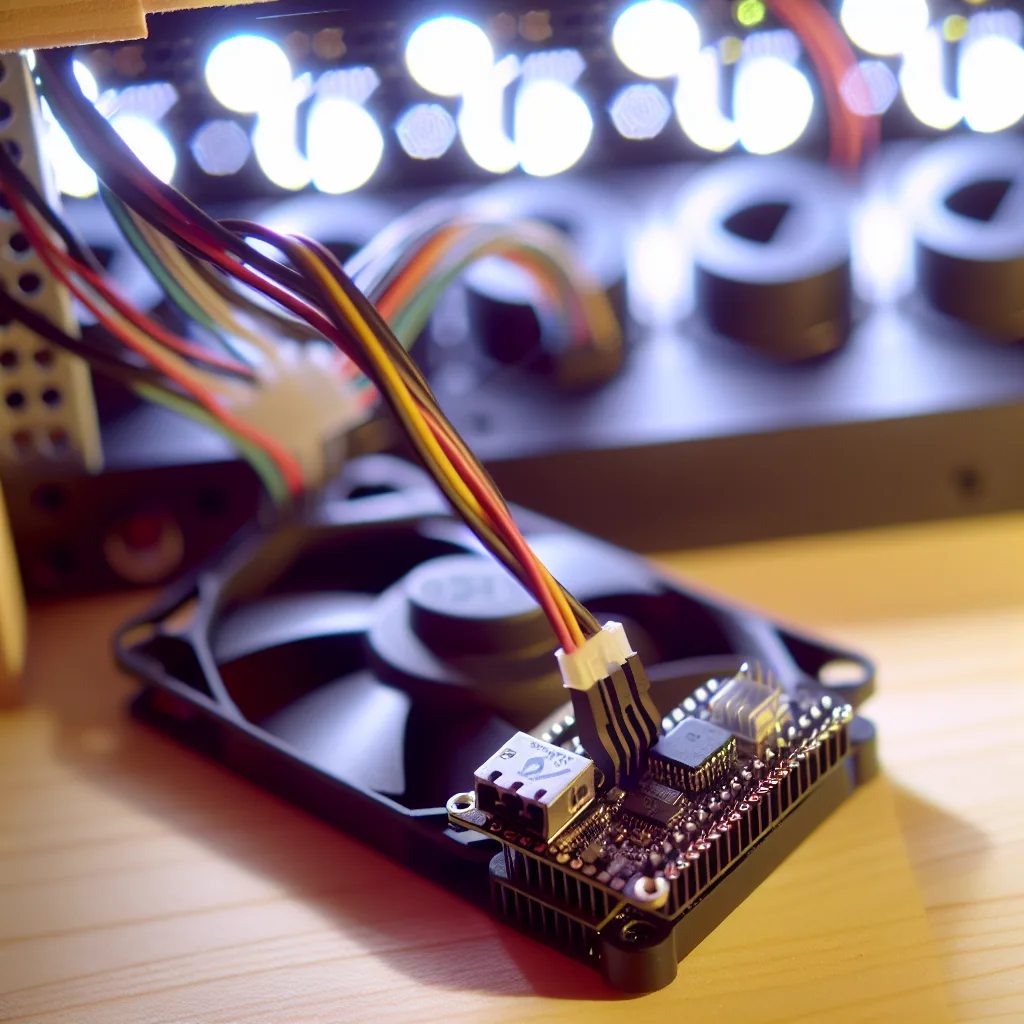
I decided to build my own solution. I call it “Pankha,” which is the Hindi word for fan. The concept is pretty simple: a small, intelligent device that sits between my server’s motherboard and the fans, making decisions based on data it gets from my central home automation system.
The heart of the project is an ESP32, a tiny and affordable microcontroller with built-in Wi-Fi. It connects to my network and pulls temperature data from Home Assistant, which already monitors all the sensors in my server rack.
Here’s a basic rundown of how it works:
1. Data Source: Home Assistant reads the CPU temperature from my server every few seconds. You can learn more about how it integrates with different systems on the official Home Assistant website.
2. The Brains: The ESP32 subscribes to that temperature data. I wrote a simple script that defines a fan curve—a set of rules that tells the fans how fast to spin at certain temperatures. For example, if the CPU is below 45°C, the fans run at a silent 20%. If it climbs to 65°C, they ramp up to 75%.
3. The Controller: The ESP32 then generates a PWM (Pulse Width Modulation) signal. This is the standard way modern 4-pin computer fans control their speed. If you want a deep dive into how PWM fans work, the engineers at Noctua have a great technical overview. The signal is sent to the fans, and voilà—intelligent, temperature-based speed control.
Building Your Own Homelab Smart Fan Control
The best part about a project like this is how accessible it is. You don’t need to be an electrical engineer. With a component kit from a place like Adafruit and some online tutorials, you can get started pretty quickly.
The results have been fantastic. My office is now quiet. The constant drone is gone, replaced by a low hum that only ramps up when I’m really pushing the server. It’s the best of both worlds: my hardware stays protected from overheating, and I get to keep my sanity.
If the noise from your homelab is driving you crazy, I can’t recommend a DIY smart fan control project enough. It’s a rewarding, practical solution that delivers a huge quality-of-life improvement for anyone who lives with their servers.